Anyone who has a photography website has probably come across this little conundrum before – how to export images in the best way? In this article we look at the optimum settings to export your images with before you upload them to your website gallery.
The key criteria
There are two important criteria your images should fulfil before you post them on your website:
- Your images should look decent
- Your images should not take a long time to load when your visitors click to view them
When you export your images from whatever editing software you choose, you can select the image dimensions and the maximum file size.
Our aim is to select the minimum file size we can without sacrificing too much image quality.
Note I said too much image quality.
As photographers we are usually perfectionists, but when we post online we have to accept that we’ll lose a bit of image quality in order that the images load at a reasonable speed.
Thankfully download speeds are getting better all the time so we are having to sacrifice less and less.
Dimensions and sizes
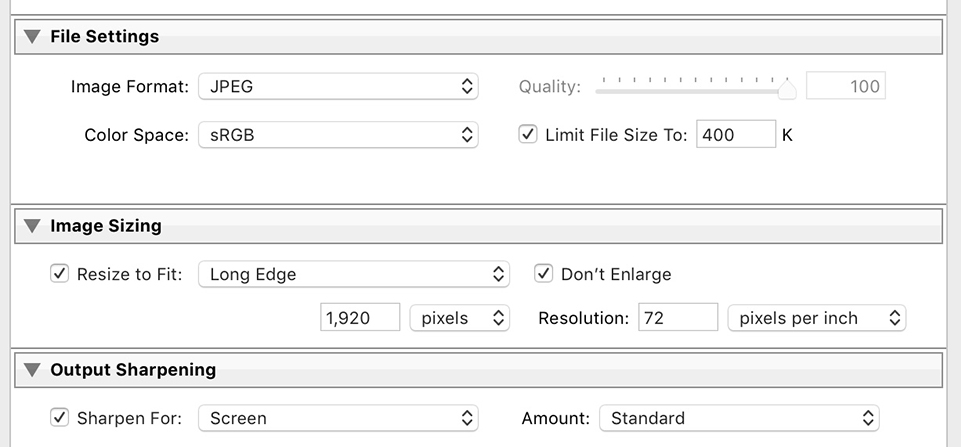
Generally in website design I’d suggest it’s good to keep all images below 250kb. But because in this case our images are the main focus of attention, I normally aim for around 400kb.
As for image dimension, if you want people to be able to view your pics in all their glory on a huge monitor, then go for 1920 pixels on the long edge. This way the size of your image will only be limited by the size of someone’s screen.
But if you’re less bothered about that and you’re happy with images that don’t need to be massive – and hey, if most of your audience are likely to be on phones, tablets or laptops – then you’ll find something like 1080 pixels on the long edge will be sufficient.
See the settings we’re talking about in the image below, from the Lightroom export facility.
JPEGmini
JPEGmini is a cool tool that does that little bit extra to squeeze your file size while maintaining quality. Some people swear by it, and I’ve been a keen user of it at times too. Try it out. There is a free version which is very useable, and you’ll quickly get a feel for it.
Currently I’ve decided the extra step in the process is something I could do without, so I’ve not been using it. But if you really want to go to town on maximum IQ and minimum size then it’s well worth trying out.
Which brings me on to my last point…
Don’t sweat it
At the end of the day, don’t worry about how to export images too much. It’s possible to be too fixated on this sort of thing, and your audience won’t be examining your images nearly as much as you do!
Just keep your images between 300kb and 500kb and everything will be cool. Find a rough balance between file size and image quality and stick with it.
Remember, it’s easy to get caught up in the details. The better your photography is the less the details matter. And if your photography isn’t up-to-scratch the details don’t matter anyway!
